Roasted spatchcock chicken is one of the easiest ways to roast a whole chicken. Removing the backbone and flattening the bird helps it cook evenly, gives you beautifully crispy skin, and shortens the roasting time. All you need is a pair of kitchen shears and a simple olive oil seasoning blend. Roast it on a sheet pan or in a large skillet for a weeknight-friendly chicken dinner, with leftovers for soups and salads. And I'll show you my simple trick for crispy, golden skin.
Removing the backbone and roasting chicken flat solves the two biggest roast chicken dilemmas: dry breast meat and undercooked legs. Because the bird cooks on one even plane, it roasts faster and more evenly, while the skin gets full exposure to the oven's heat for a golden, crispy finish. Spatchcock roasted chicken is easier to season, easier to carve, and perfect for roasting two birds side-by-side on a large sheet pan when you want extra leftovers or are feeding a crowd.
Why Make Roasted Spatchcock Chicken
- Even roasting - For consistent results and crispy skin.
- Easy carving - No wresting with a round bird to cut apart.
- Faster cooking - A flattened chicken roasts quicker than a whole "round" bird.
Chef's Tip - The Trick for Golden Crispy Skin
Pat the chicken completely dry and roast at high heat. For an extra-crispy and golden finish, add a little baking soda to your seasoning blend (about ¼ teaspoon for a whole chicken). It gently raises the chicken's skin pH level, helping it brown faster and crisp more evenly. A little goes a long way-don't overdo it, but it works like magic!
Ingredients You'll Need
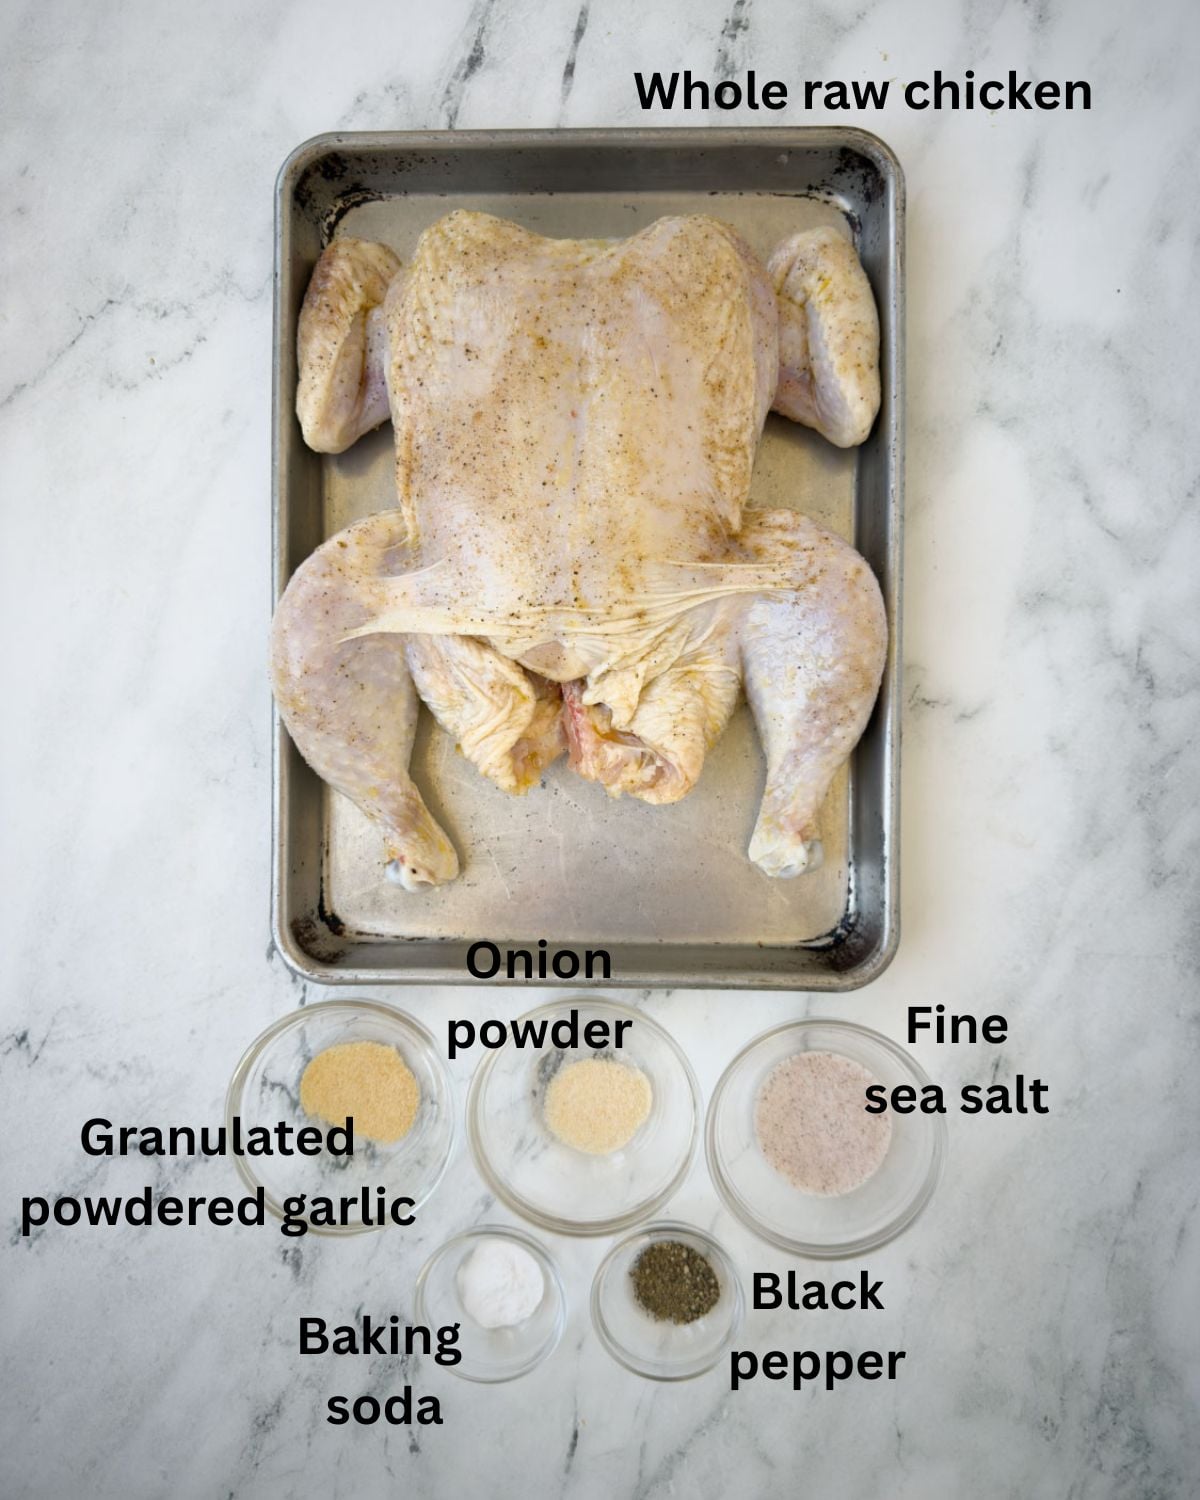
- Chicken - Use a whole chicken (about 4-5 pounds).
- Oil - Olive oil or avocado oil. Helps seasoning adhere, promotes golden, crisp skin.
- Baking soda - A little helps the skin brown and crisp more deeply.
- Seasoning options - Season simply with salt, pepper, and granulated garlic (my go-to). You can also use a poultry seasoning, lemon pepper, or your favorite rub-just keep the coating light and watch the color near the end, since some blends brown faster at high heat (depending on sugar).
Please see the recipe card for measurements. For tools, you'll need poultry shears.
Chef's Tip - Why I Use Olive Oil Instead of Butter
For spatchcock chicken, olive oil gives you reliable, even browning and crisp skin at roasting temperatures. Butter adds great flavor, but its milk solids can brown too quickly and sometimes scorch on the pan or the skin. Extra virgin olive oil helps the seasonings stick, promotes beautiful golden color, and keeps the skin crisp. If you love buttery flavor, brush on a little melted butter at the very end for richness without risking burnt spots.
How to Make Roasted Spatchcock Chicken
Preheat the oven to 400°F convection. The high heat helps render the fat in the skin and promotes even browning while keeping the meat juicy. Most spatchcocked chickens roast in 40-60 minutes, depending on chicken size, oven accuracy, and whether you're using convection or standard bake.
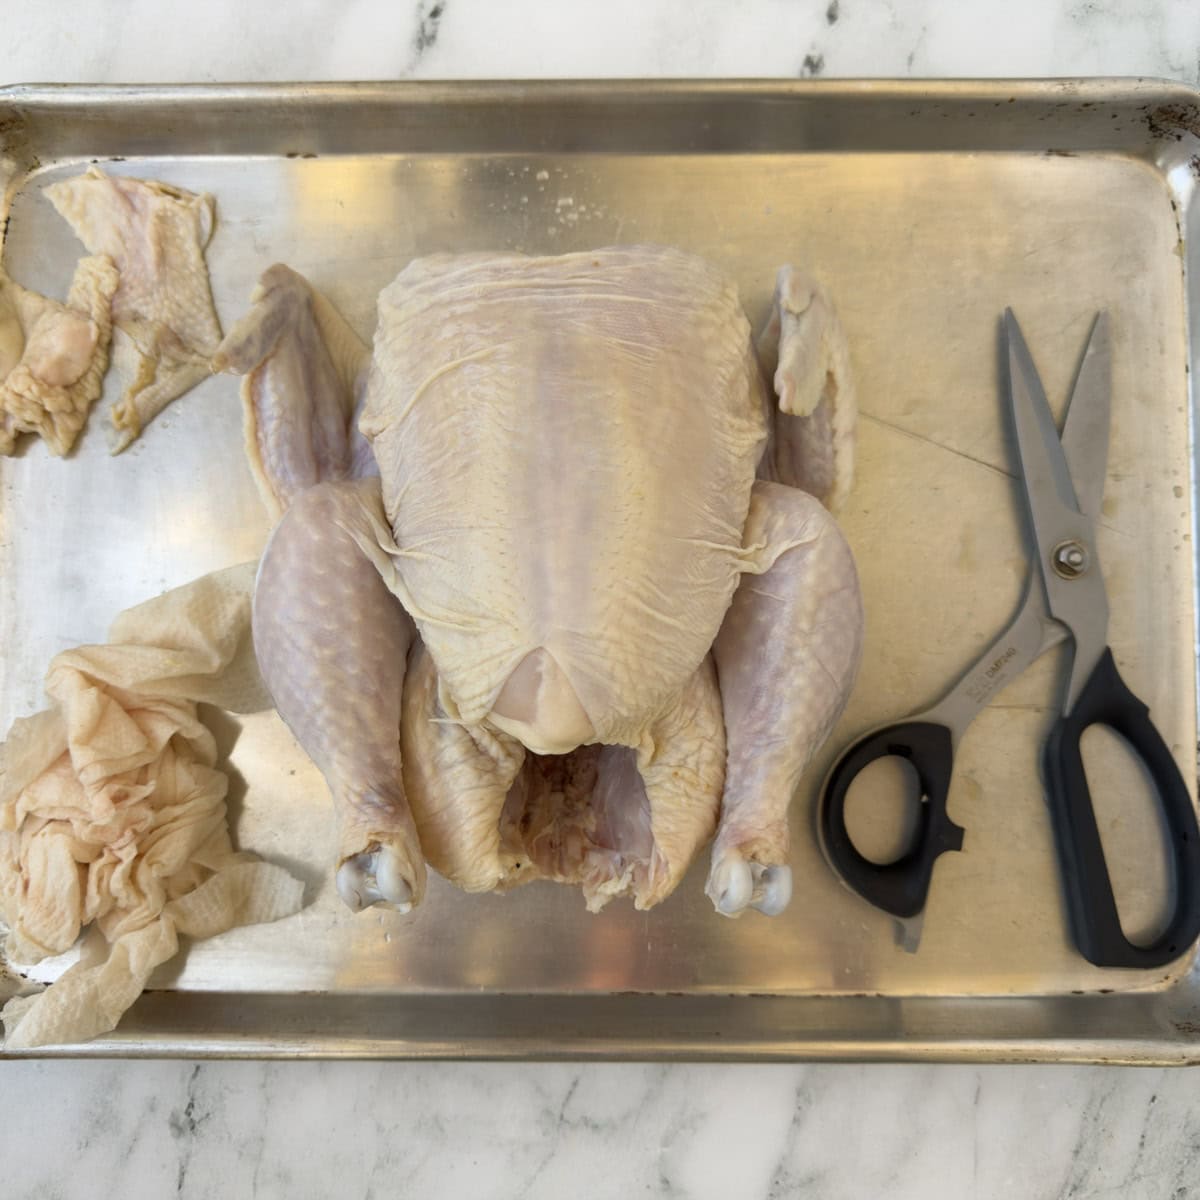
- Place the chicken on a sheet pan to catch drips. Remove the innards bag, if included. Dry the chicken well with paper towels, inside and out. Trim excess fat and skin from the neck and tail.
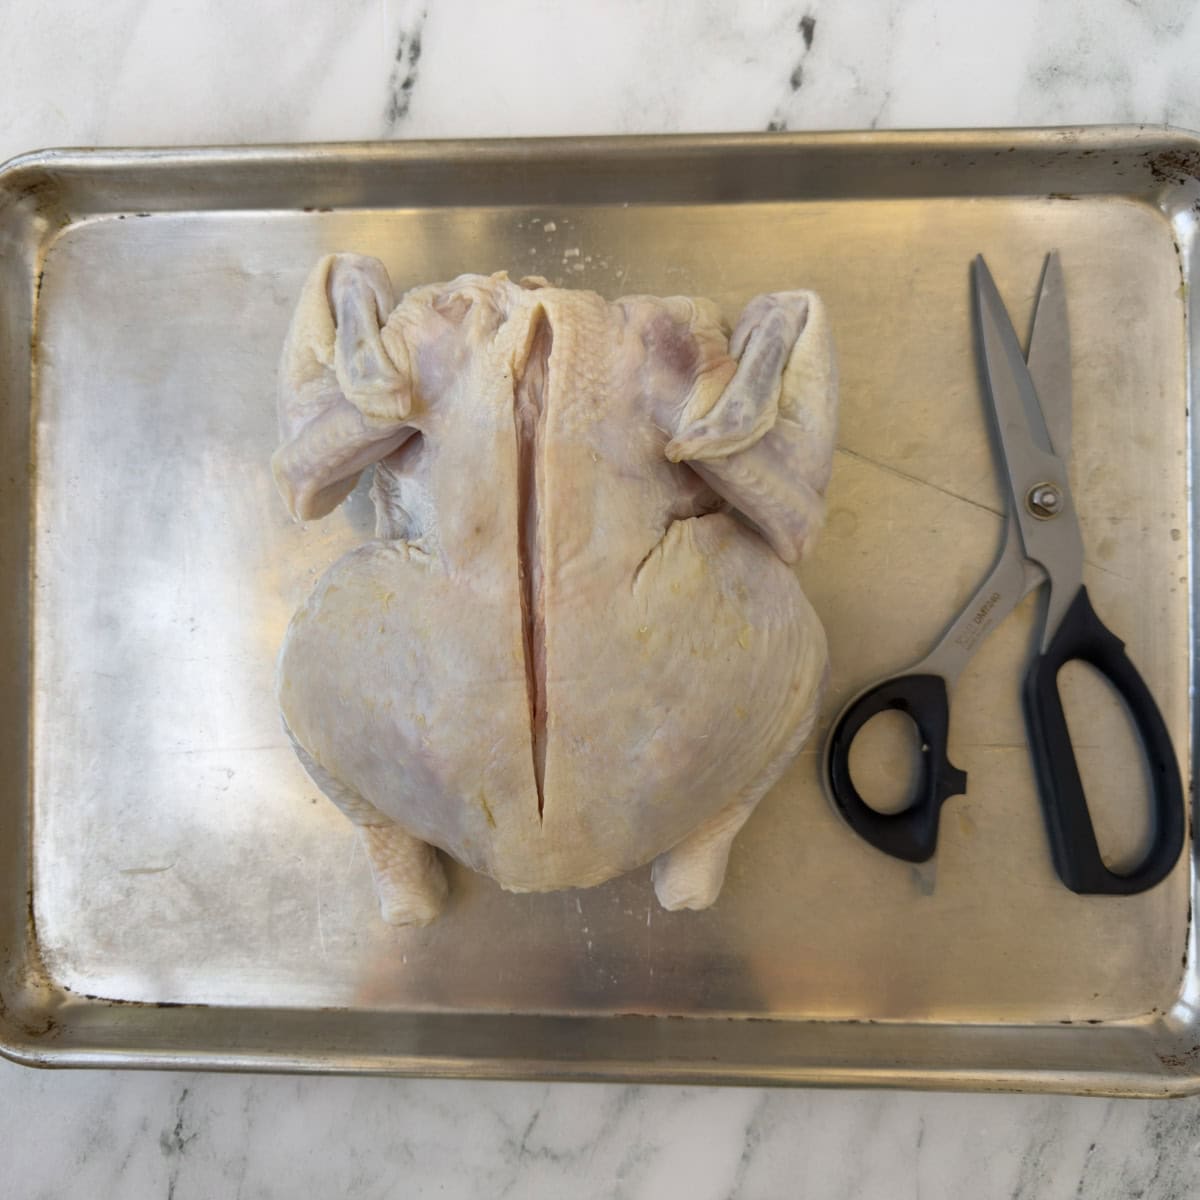
- Turn the chicken breast side down and score a shallow line down the center of the backbone as a guide.
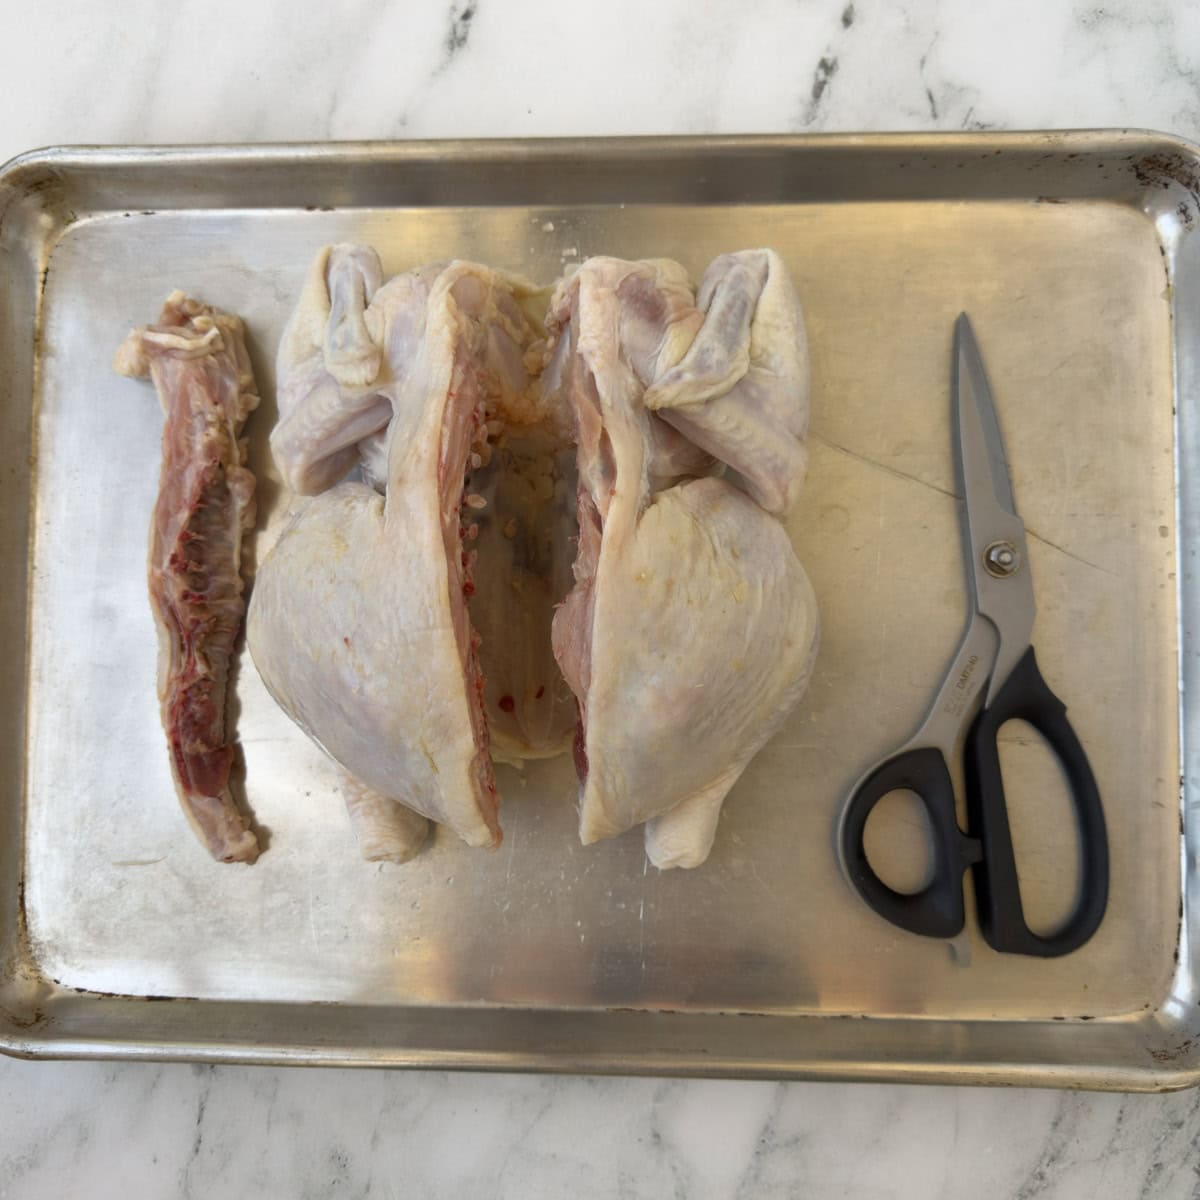
- With poultry shears, cut along both sides of the backbone and remove it. Save and freeze the backbone for broth.
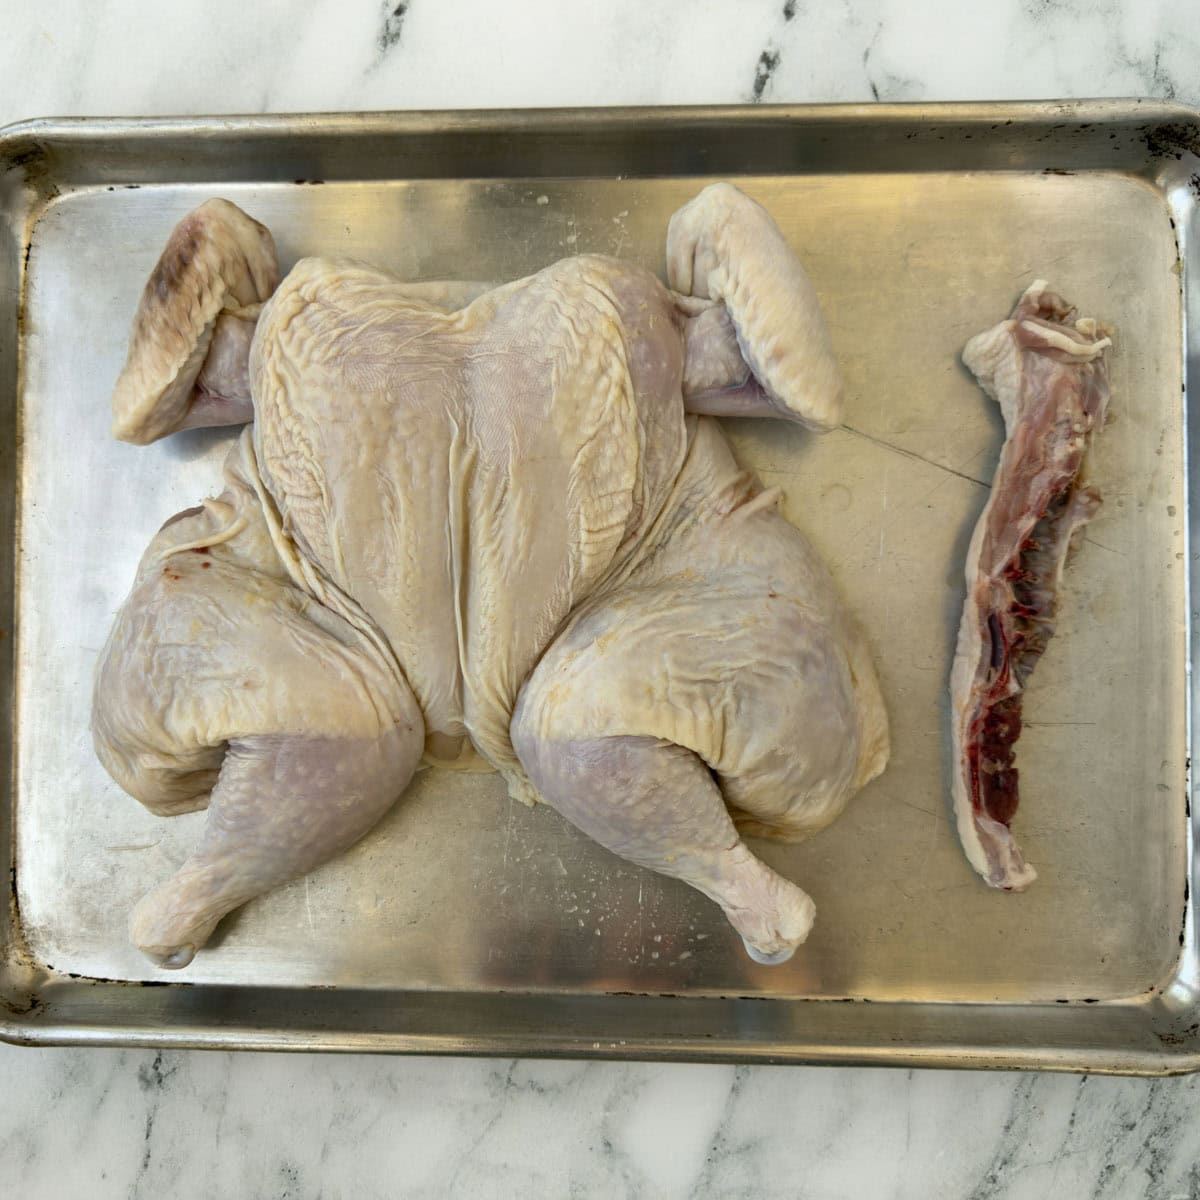
- Turn the chicken breast side up and press down firmly on the breastbone to flatten. You may hear it crack; that is normal.
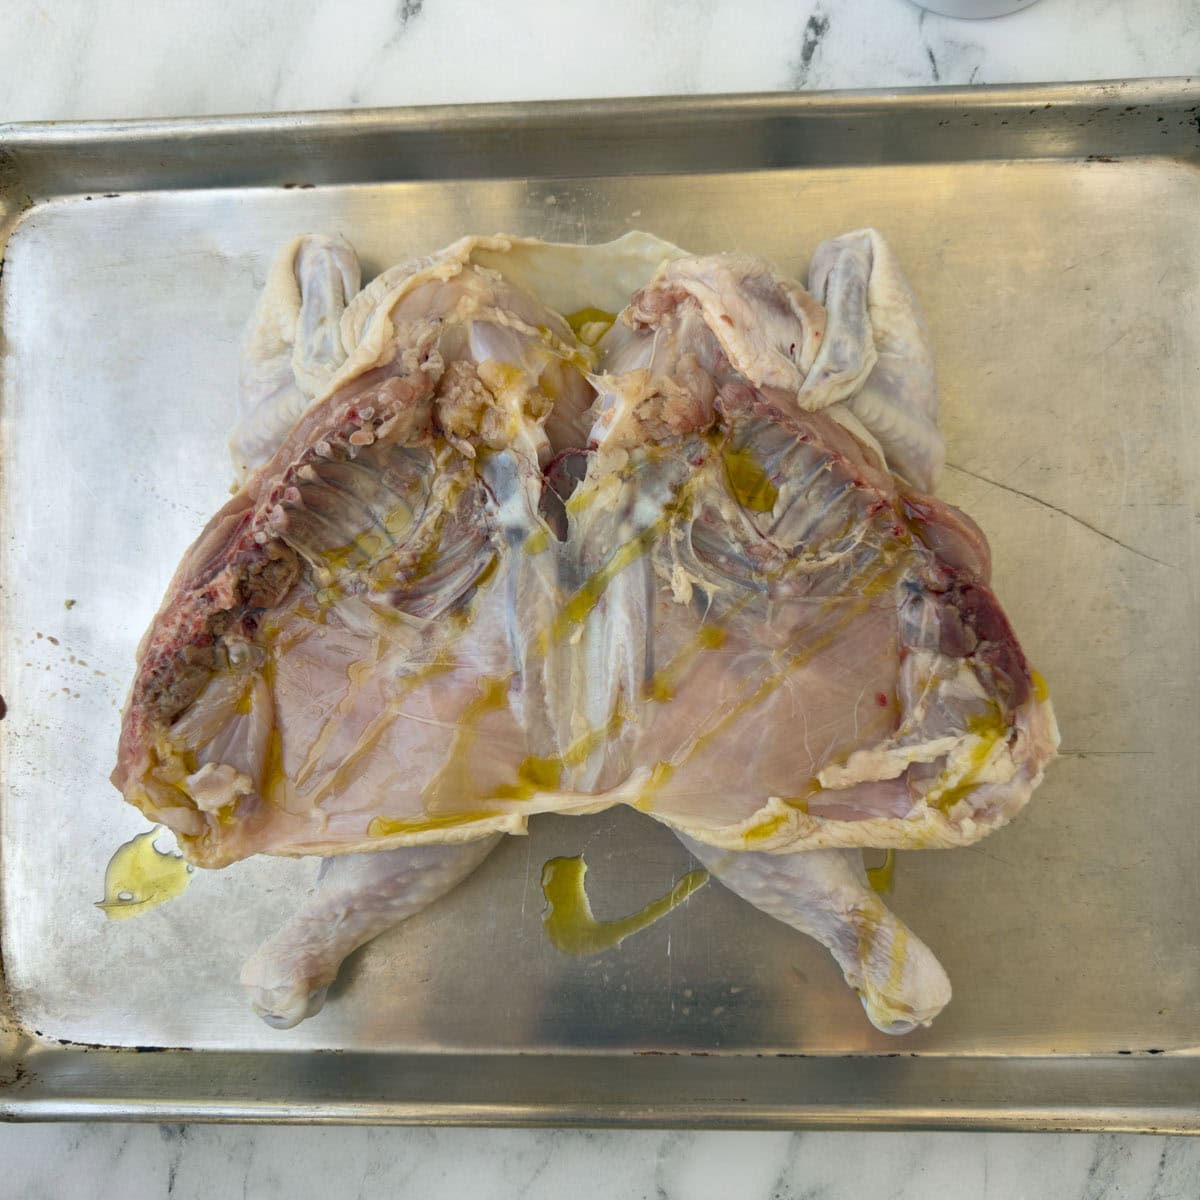
- Turn the chicken over again, drizzle the underside with a little olive oil, and sprinkle with kosher salt.

- Turn the chicken skin side up, drizzle with oil, then sprinkle evenly with the seasoning blend. Roast for about 45 minutes, or until done. See the recipe card for temperatures.
Chef's Tip - How to Know When the Chicken is Done
Insert the probe near the inner thigh near the hip joint for the most accurate doneness check-but don't touch bone and don't aim right into the joint (it can read off). Thigh meat is happiest at 175-185°F. Use the breast as a secondary check-pull it at 160-165°F, then rest for a few minutes before carving. A 4 ½ pound bird on 400°F takes 45 minutes in my convection oven.
Serving Spatchcock Roasted Chicken
Spatchcock chicken is easy to serve because it's easy to carve. Try it with simple sides like:
- Creamy riced mashed potatoes.
- Brussels sprouts with pancetta.
- Air fryer butternut squash.
- Simple blanched green beans (take 5 minutes).
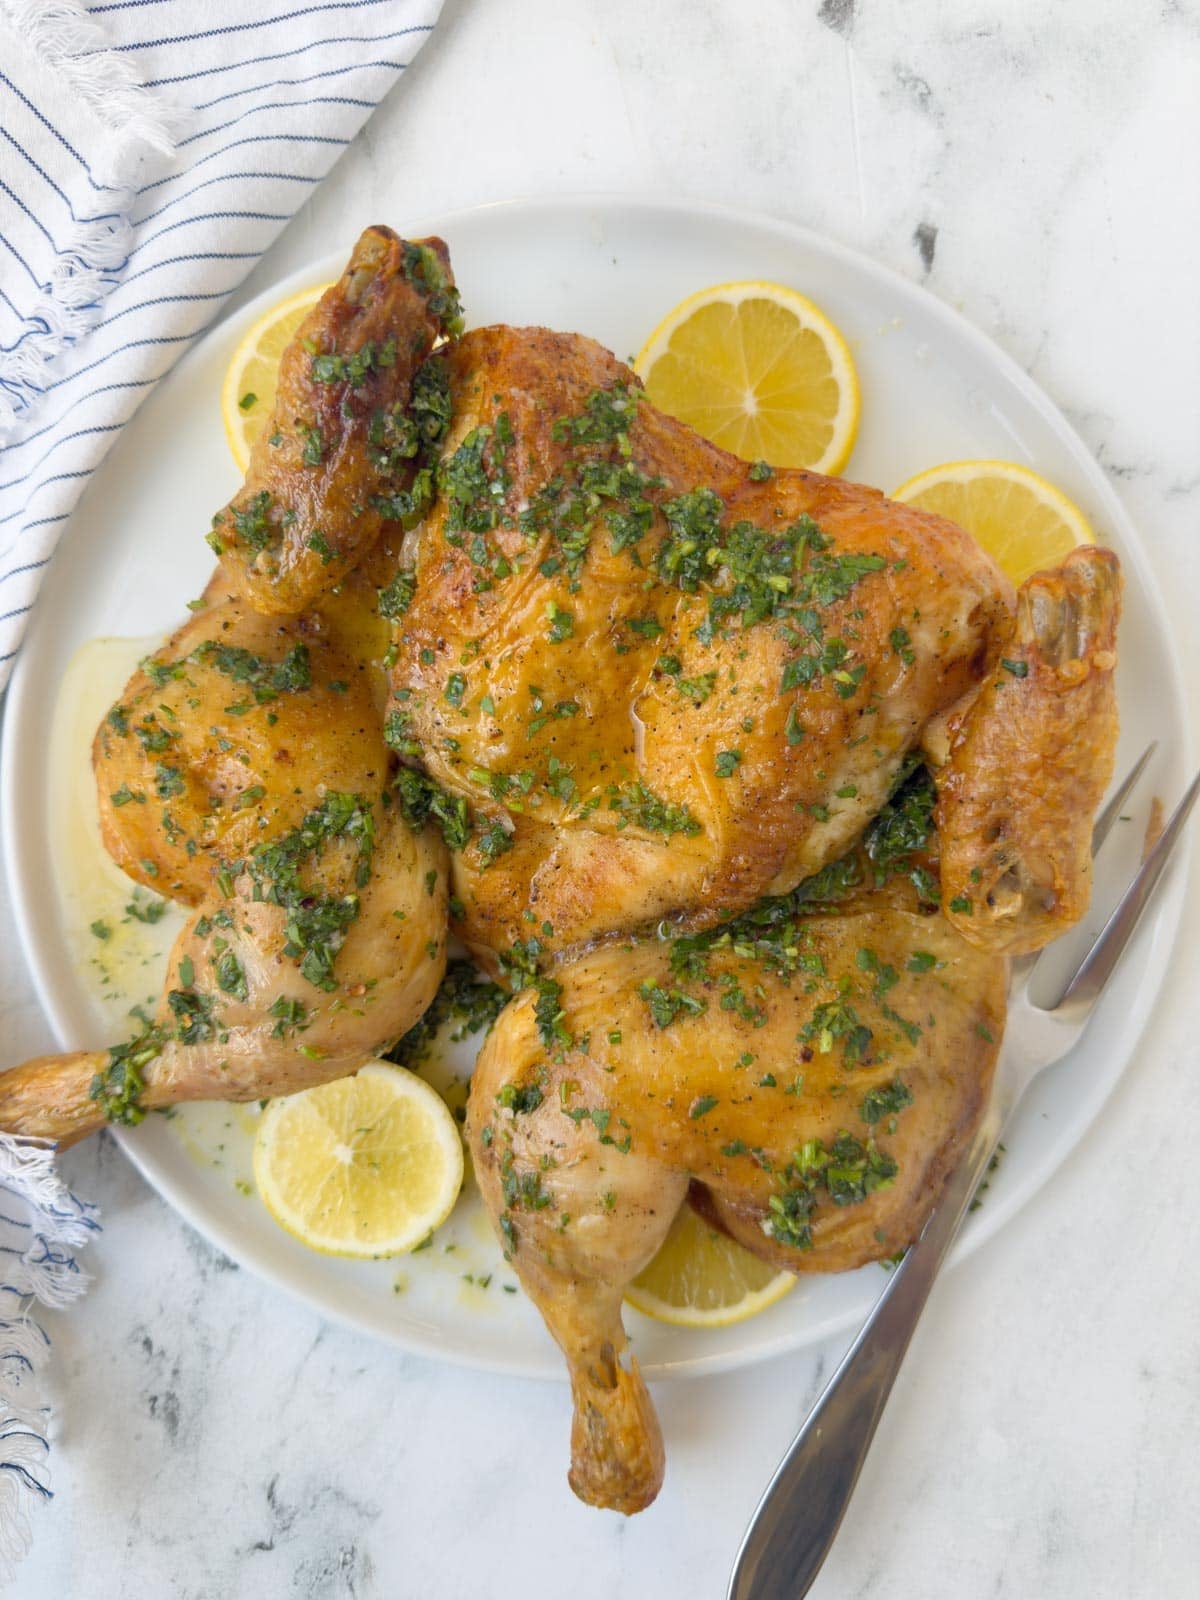
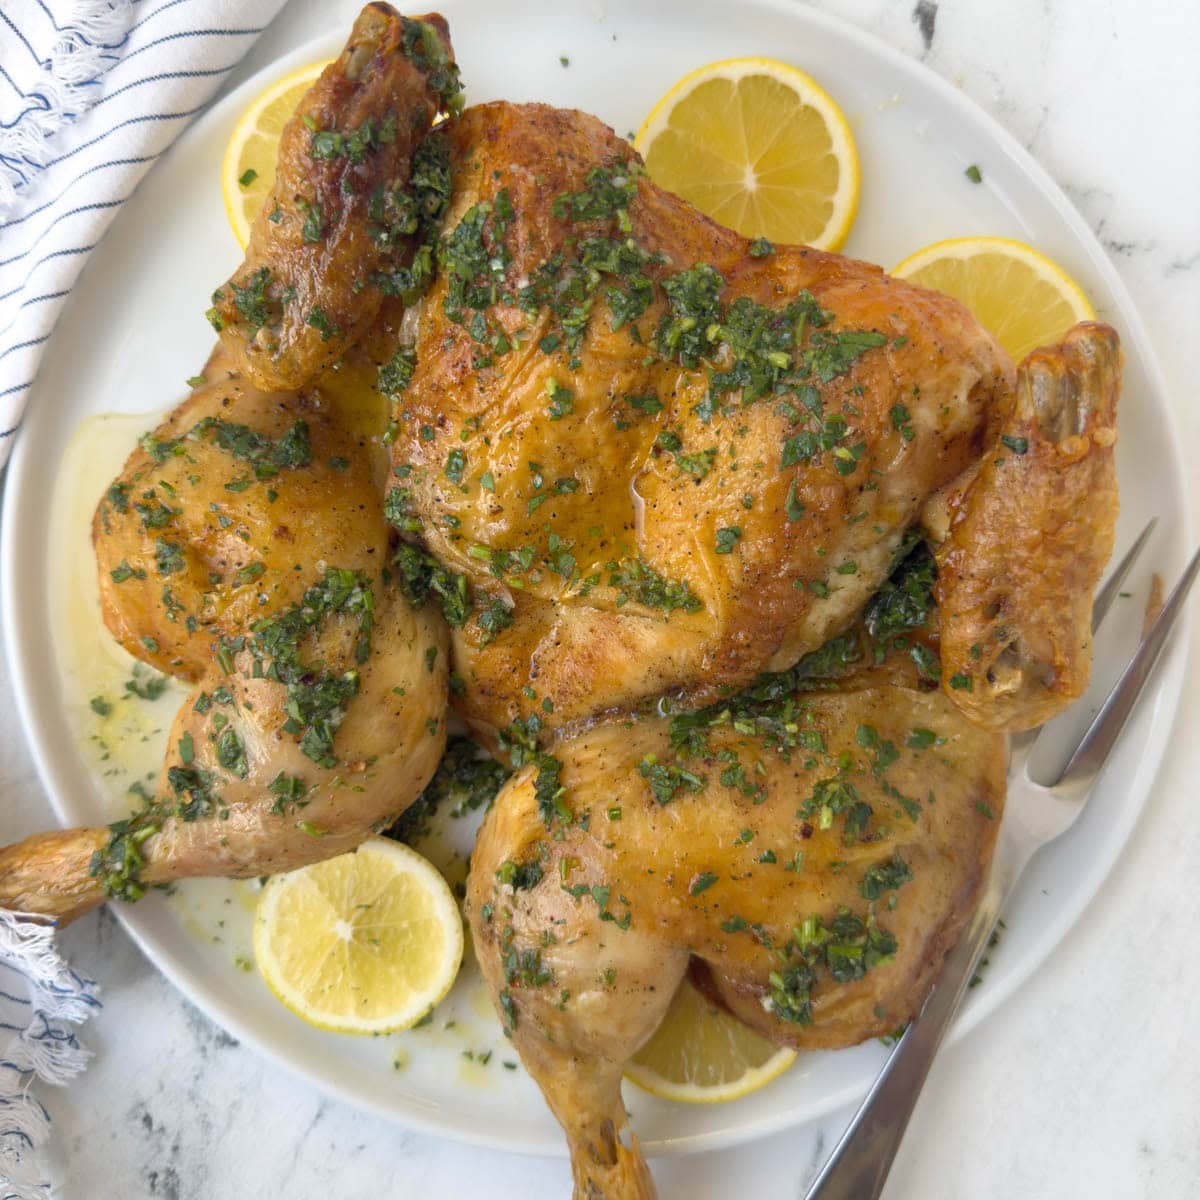
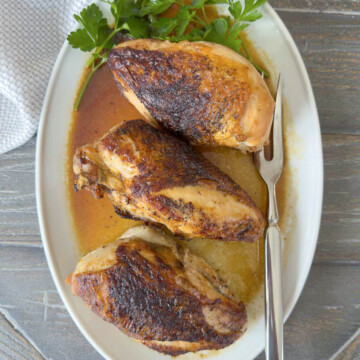
What's in the photo: Optional lemon-herb drizzle - a quick gremolata-inspired mix of parsley, thyme, lemon zest and juice, garlic, and olive oil. Spoon it over the chicken right before serving for a fresh, bright finish.
Storage and Leftovers
Store leftover roast chicken in an airtight container in the refrigerator for up to 4 days. It's great for salads, soups, and sandwiches. Freeze leftovers for 2-3 months.
More Chicken Recipes
Chicken is one of the most versatile proteins to cook at home, whether you have boneless or bone-in cuts, breasts or thighs. From simple roasted chicken to air fryer and grilled recipes, there are countless ways to enjoy it throughout the week.


Please Leave a Comment
If you make roasted spatchcock chicken, please leave a comment on how it came out for you! I love hearing from you and appreciate your comments, plus they help other readers.
📖 Recipe

Roasted Spatchcock Chicken
Equipment
- Poultry shears also called heavy kitchen shears
Ingredients
Chicken
- 4 ½-5 pound whole chicken
- 1 tablespoon extra virgin olive oil
Seasoning blend
- 1 ½ teaspoons sea salt
- ½ teaspoon black pepper
- ¼ teaspoon baking soda
- ¼ teaspoon granulated garlic powder
- ¼ teaspoon onion powder
Would you like to save this recipe?
Instructions
Set up
- Preheat the oven to 400°F on convection mode. Cover a rimmed half sheet baking tray with parchment.
Dry the chicken
- Remove the innards bag if there is one. Pat the chicken very dry, inside and out, with paper towels.
Spatchcock the chicken
- Place the chicken breast side down on a large cutting board. To give yourself a guideline, score a shallow line down the center of the backbone.With poultry shears, cut along both sides of the backbone from top to bottom and remove it. Save and freeze the backbone for making chicken broth.Turn the chicken over, breast side up, and press down firmly in the center of the breastbone to flatten it. You may hear it crack; that is normal. Tuck the wing tips under the bird if desired.
Prepare for roasting
- Mix the salt, pepper, baking soda, granulated garlic, and onion powder together in a small bowl. Rub the chicken with olive oil on both sides. Season the underside with salt only, then turn the chicken skin side up and sprinkle the skin evenly with the seasoning blend.
Roast the chicken
- Place the chicken on the prepared baking sheet and roast for about 45 minutes, or until the breast reaches 160°F-165°F and the thighs reach 175°F-180°F.Remove the chicken from the oven and rest for 10 minutes, loosely covered with foil, before carving.Optional: While the chicken rests, make the lemon herb drizzle for serving.
Carve the chicken
- Place the chicken on a cutting board. Slice between the body and the leg/thigh section to remove each whole leg. Then slice down the center of the chicken and remove the breast meat.
Notes
I often make a triple batch of the seasoning blend and store it in an empty spice shaker bottle so it's ready for weekly roast spatchcock chicken. It is easier to season the chicken from a shaker bottle than sprinkling. Storage and leftovers note
Store leftover chicken in an airtight container in the refrigerator for up to 4 days. Use leftovers for salads, soups, bowls, tacos, or chicken salad. Frozen cooked shredded chicken lasts for 3-4 months for optimal quality, taste, and texture. Be sure to label and date.
Porsche guy says
I’ve never done this before, and I followed your directions, they were really simple. I can’t believe how easy this was and how good the chicken came out!