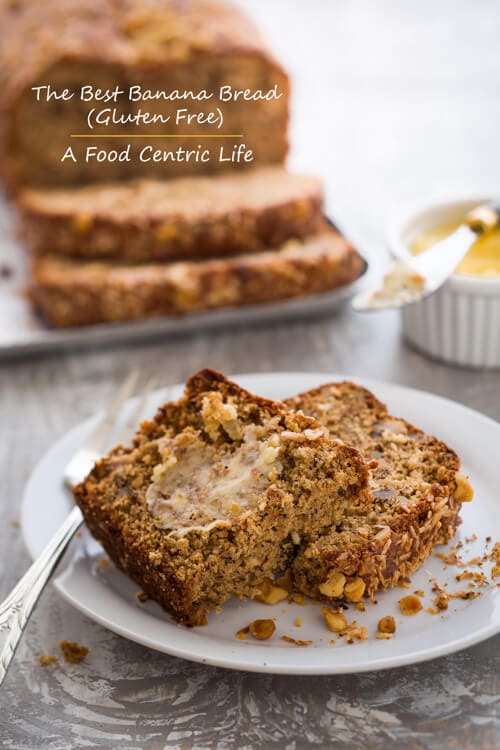
Who doesn't love banana bread? It's a much loved classic recipe for good reason. But if you you eat gluten-free, you need a new recipe. Here is my modern recipe for the best gluten free banana bread.

Remembering my mom and all of the baking we did together, I overhauled her 1950’s banana bread recipe. Out with the white flour, refined white sugar and nasty partially hydrogenated fat. In with gluten-free flour, coconut sugar and coconut oil. What a difference 50 years makes.
Gluten-free Flours
There are many options for gluten-free flours: buy a gluten-free blend or make your own blend. I tested this recipe with both pre-blended and home-blended flours. You cannot go wring either way.
See notes at the end of the recipe card.
Branded Blends
For a purchased blend, I use Bob's Red Mill 1:1 Baking Flour (blue bag) with great results. I've also tried their All-Purpose GF flour blend and a brand called Cup 4 Cup. Each blend is a bit different (read the ingredient label) so your results might be a little different based upon your choice.
The flavor is great, tender crumb, slices beautifully.
Blending Your Own (option)
For the adventurous, creating your own blend requires teff flour, sweet rice flour, brown rice flour and sorghum flour plus cornstarch.
The difference? This loaf has a rich brown, almost chocolaty color, a tender crust, slices nicely and tastes fantastic. I realize you've got to love baking to do this version but I wanted to include it as an option.
You'll need a digital kitchen scale, a terrific and inexpensive addition to your kitchen. Weighing ingredients is more accurate and actually faster.
Baking Tools
I use a light silver colored, uncoated, heavyweight aluminized steel loaf pan. The one I use is made by Chicago Metallic and measures approximately 10″ x 5″. If your pan is a different size, you may need to adjust your baking time.
Lastly, a food processor makes it easy to mix sticky bananas, oil and other ingredients quickly and smoothly.


Instructions
Pre-heat the oven and grease your baking pan.
- Blend the dry ingredients (flour, baking powder and soda, salt) in one bowl
- Add the wet ingredients (bananas, sugar, oil, eggs, vanilla) to a food processor workbowl
- Pulse the banana group until smooth, then add the dry ingredients and pulse until combined.
- If you want to add the optional chopped nuts, pour the batter back into the bowl and fold in by hand.
- Pour into the prepared baking pan and bake according to the recipe card.
To Serve
After removing the baked banana bread form the oven, cool it on a wire rack. Have a slice while it's still warm. It's so good. It will keep a room temperature a few days, then refrigerate or freeze what is left.
Related Recipes
For another delicious gluten-free bread try this Irish soda bread.
📖 Recipe

The Best Gluten Free Banana Bread
Equipment
- Light colored metal loaf baking pan
Ingredients
- 1 ¼ cups + 3 tablespoons gluten-free flour blend Bob's Red Mill 1:1 Gf Flour (blue bag) 219 grams
- 1 ¼ teaspoons baking soda
- ¾ teaspoons baking powder aluminum-free
- ¼ teaspoon sea salt
- 3 large ripe bananas, peeled 1 pound after peeling
- 1 cup coconut sugar or ½ sugar, ½ monk fruit blend
- ½ cup unrefined organic coconut oil, melted plus extra to grease pan
- 2 large eggs
- 1 teaspoon vanilla extract
Optional Add
- ½ cup chopped walnuts
Instructions
- Pre-heat oven to 350 degrees. Using a paper towel, grease a light colored metal baking pan, approximately 5 ½″ x 10 ½″ (14×27 cm) with a teaspoon of coconut oil.
- To a medium bowl add flour, baking soda, baking powder and salt and whisk or stir to combine. To the bowl of a food processor fitted with the S blade add bananas, sugar, oil, eggs and vanilla. Pulse to combine until smooth. Add the dry ingedients and pulse until just blended.
- Pour the batter into the prepared pan and bake for approximately 50 minutes. The top will feel firm to the touch and a toothpick inserted into the center will come out clean with just a few moist crumbs. Remove from the oven and cool on a wire rack for 15 minutes. Run a long thin knife or metal spatula between the pan and bread to loosen it if needed, then turn the bread out on a wire rack to cool completely before slicing. Freeze what you don’t eat within a couple days.
Chef Sherry Hall says
This recipe looks great! I love the Cup4Cup flour! I will definitely try this recipe for clients.
Thank you! 🙂
Sally says
Sherry, the C4C is nice. I'd highly recommend you get the GF flours and make the blend. That loaf was incredible! If you do, please report back.
Madonna/aka/Ms. Lemon says
Sally, As long as I have been reading your blog I have not read one of your post that you seemed so proud. I have been working my way toward healthier cooking so I guess this one should go on my list.
You are absolutely correct about getting a scale. I have a difficult time now when I hear someone say a cup of flour – so is that 4.25 oz, or 4.5, or even 5 oz. ? It can be the difference between delicious and hockey puck. And, all those years baking in dark pans when the directions really meant light colored pans, I think these are things experienced bakers find obvious is really critical for those of us - the uninformed.